
 Konstrukcja taka sama jak przed laty
Budowę zaprojektowanego przez nas ogrodowego wiatraka zaczynamy od zmontowania ścian budynku. Elementy o wysokości 36 cm w połowie wysokości obu ścian ścinamy pod kątem 52 stopni i sklejamy w narożnikach. Utworzone w narożnikach domu ścięte powierzchnie wypełniamy następnie odpowiednio przyciętymi płytami w kształcie trójkątów. Przycięte z grubsza kawałki sklejki układamy na otworach i od spodu zaznaczamy na nich ołówkiem dokładne linie cięcia.
Krawędzie przycinamy pilarką z tarczą ustawioną pod kątem 45 stopni, po czym dokładnie dopasowujemy za pomocą tarnika i hebla. Następnie sklejamy wszystkie krawędzie. W ten sposób górna rama otrzymuje kształt ośmiokąta równobocznego. Aby w połowie wysokości ścian budynku dolnego powstał uskok na podpory galerii, niezbędne będzie ich pogrubienie.
Kolejną operacją będzie przycięcie ośmiokątnej płyty podstawy i naklejenie na niej ośmiu par belek. Wystające wysoko podwójne wsporniki sklejamy oddzielnie i osadzamy na parach belek.
Górne wykończenie wsporników stanowi mniejszy przeciwelement ośmiokątnej płyty podstawy. Wszystkie wymienione tu elementy odpowiednio połączone ze sobą tworzą podstawowy kształt wiatraka. Pary belek galerii podpieramy od dołu, odpowiednio przycięte segmenty podłogi sklejamy i osadzamy na belkach. Uzupełnienie konstrukcji galerii stanowią przymocowane do niej słupki i balustrada.
Ukośne wsporniki zbiegające się stożkowo do góry są oparciem dla desek. Układamy je tak, by zachodziły na siebie i przyklejamy. Dopiero teraz przycinamy je od zewnątrz, na odpowiednią szerokość.
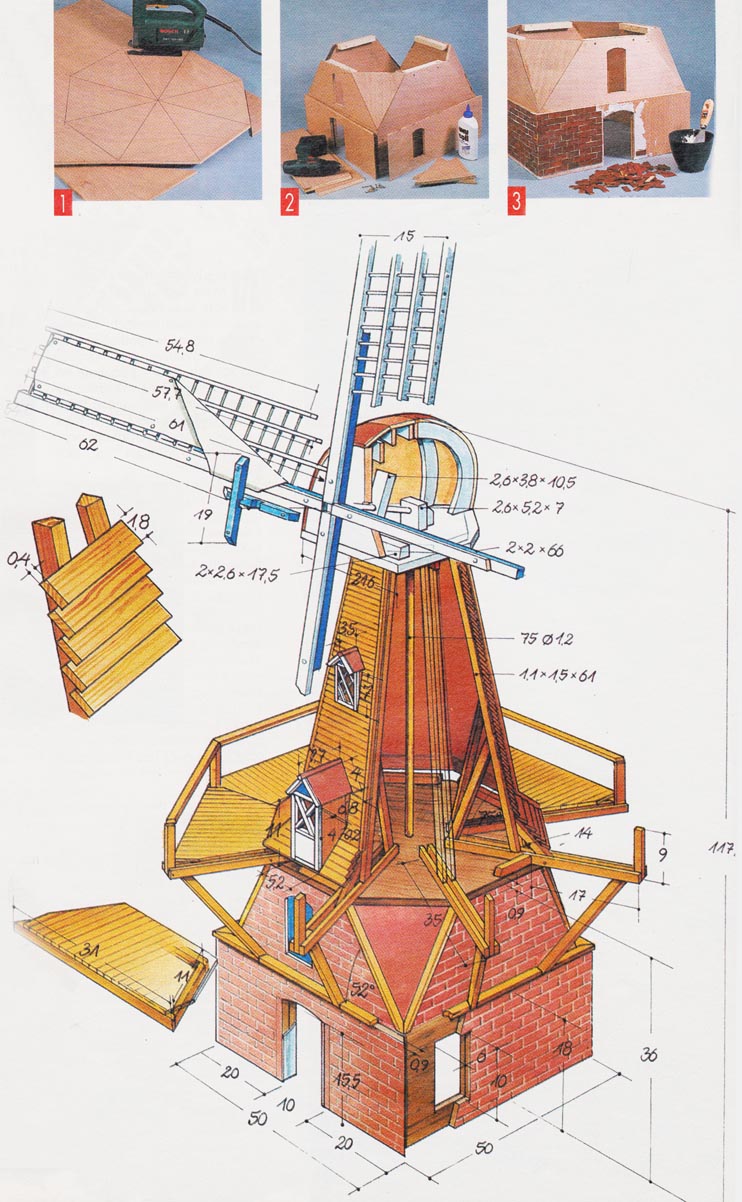
1. Płyty podstaw i ściany wycinamy z wodoodpornej sklejki o grubości 9 mm. Krawędzie wyrównujemy ręcznie lub szlifierką.
2. Ściany sklejamy w narożnikach, w dolnej części pogrubiamy, u góry dopasowujemy płyty i umieszczamy ich listwy nośne.
3. Malujemy deski. Wycinamy gonty i przyklejamy je na ścianach wodoodpornym klejem (po wyschnięciu bezbarwnym).


