Zrób to sam – drewniana piaskownica.
Budowa pełnoprawnego placu zabaw dla dzieci rozpoczyna się od piaskownicy, składającej się z wielu elementów (zjeżdżalnia, huśtawka, domek), które będą dodawane wraz z dorastaniem dziecka.
Według rodziców piaskownica to miejsce do gier, w którym można zająć swoje dziecko przez długi czas. Psychologowie twierdzą, że piaskownica dla dzieci odgrywa ważną rolę: rozwijają się zdolności motoryczne rąk, kształtuje się kreatywność, przejawia się wytrwałość i cierpliwość.
Rodzaje piaskownic dla dzieci
Istnieją dwa rodzaje piaskownic dla dzieci:
1. Cechy konstrukcyjne:
– otwarta piaskownica (konstrukcja łatwa w produkcji);
– zamknięta piaskownica. Cieszy się popularnością wśród użytkowników, ponieważ pozwala chronić piasek przed: brudem, deszczem, wiatrem, zwierzętami. Dodatkowo dziecięca piaskownica z pokrywką chroni piasek przed warunkami atmosferycznymi, pozwala na przechowywanie zabawek pod pokrywą (foremki, łopatki, grabie itp.), A także może służyć jako dodatkowy plac zabaw (jeśli zostanie przekształcony do stołu i krzesła).
2. Według materiału produkcyjnego:
plastik, metal, drewno
Każdy z materiałów ma swoje zalety i wady.
Plastikowa piaskownica
Nie przegrzewa się na słońcu, ma kompaktowe rozmiary, jest lekka, łatwa do przenoszenia, transportu, a podczas Twojej nieobecności można ją schować w budynku gospodarczym lub garażu. Wśród wad są niestabilność na światło ultrafioletowe, wysoki koszt.
Metalowa piaskownica
Zapewnia długotrwałe użytkowanie, ale nie jest bezpieczna dla dzieci, jest również gorąca i pracochłonna w zrobieniu.
Drewniana piaskownica
Najlepsza opcja, ponieważ drewno jest przyjazne dla środowiska, bezpieczne i niedrogie.
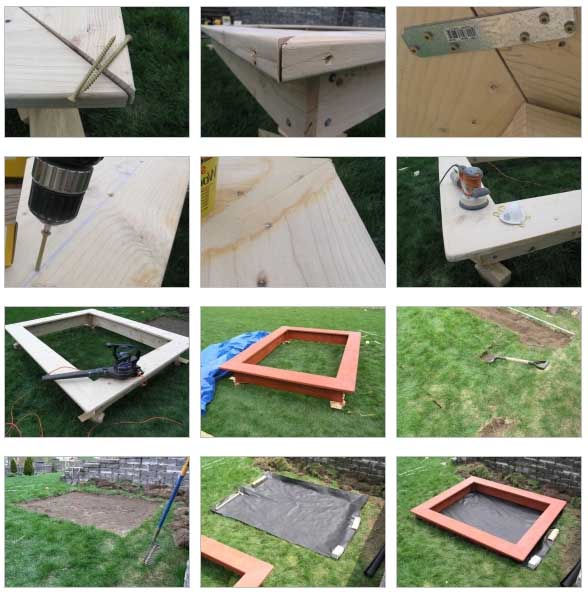
Dlatego zastanowimy się, jak zbudować drewnianą piaskownicę dla dzieci – niezależną technologię z wykorzystaniem dostępnych materiałów (narzędzi). Zacznijmy od otwartej, ponieważ jest to najłatwiejsza do wdrożenia opcja dla początkujących bez doświadczenia konstrukcyjnego. Produkcja zajmie tylko kilka godzin, a jeśli masz kompetentny rysunek, w każdej chwili możesz do niego przymocować pokrywę.
Jak zrobić piaskownicę własnymi rękami – instrukcje krok po kroku
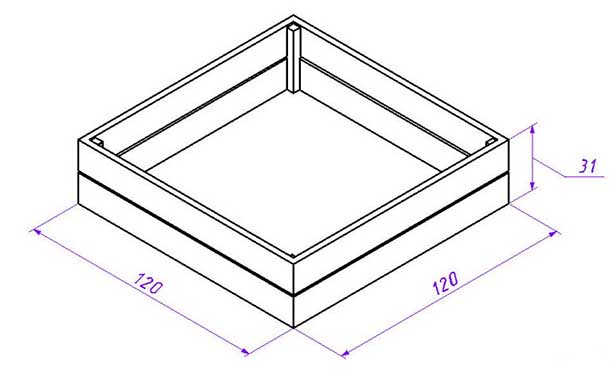
Etap 1 – Rysunek piaskownicy wykonanej z drewna
Pomimo tego, że projekt jest prosty, szczegółowy układ piaskownicy pozwala racjonalnie obliczyć ilość materiału i wybrać odpowiednie miejsce dla piaskownicy.
Często piaskownica wykonana z drewna to kwadrat o określonej wysokości, który zabezpiecza piasek przed wysypaniem.
Rysunki piaskownicy (dla prostej konstrukcji) podano poniżej.
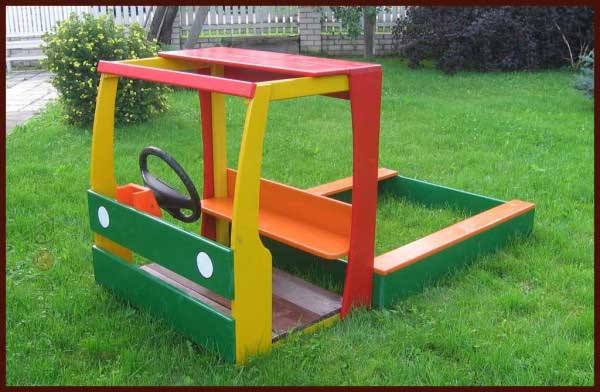
Bardziej złożony projekt: obejmuje krzesła, ławki, stoły, pokrowiec, dach, zjeżdżalnię itp. lub piaskownica wykonana w formie samochodu (samochodu), łodzi-statku, domu-zamku.
W każdym razie cel funkcjonalny podstawowej konstrukcji jest taki sam – ogrodzenie, które chroni piasek.
Rada. Planując budowę piaskownicy należy wziąć pod uwagę to, dla ilu dzieci będzie ona przeznaczona.
Budowa piaskownicy własnymi rękami – wskazówki
1. długość zależy od wysokości piaskownicy, która z kolei zależy od wieku dziecka. Wysokość piaskownicy powinna być taka, aby dziecko mogło po niej przejść. Optymalna wysokość to 300 mm (pozostaje 150 mm do kopania i mocowania konstrukcji).
2. grubość desek musi wynosić co najmniej 30 mm. Zapewni to wystarczającą wytrzymałość konstrukcyjną i zapobiegnie pękaniu drewna.
3. sklejka jest niezbędna przy produkcji skomplikowanych konstrukcji, jak np. piaskownica w postaci statku (łodzi). Wykonane są z niego wyprofilowane produkty o okrągłym, owalnym kształcie.
4. lepiej jest obrobić płyty przed montażem. W ten sposób nie będzie odsłoniętych kawałków drewna.
Narzędzie: piła, szlifierka, wiertarka, wiertarki, śrubokręt, ołówek, miara, poziomnica, kołki i linka, pędzle malarskie.
Etap 3 – Wyznaczenie miejsca na piaskownicę
Gdy wybrane jest miejsce do montażu. Za pomocą kołków i liny wskazany jest zewnętrzny obwód konstrukcji;
wewnątrz zaznaczonego kwadratu gleba jest wybierana na głębokość 300-400 mm. Możesz się bez tego obejść i wsypać piasek na ziemię, ale szybko stanie się on bezużyteczny, ponieważ będzie mieszał się z glebą podczas zabawy. Ponadto mogą w nim zagnieździć mrówki i inne owady;
układ drenażu – gęsto ubita warstwa z tłucznia, żwiru i piasku. Warstwa pozwoli wodzie swobodnie wpływać do gleby, a piasek szybciej wysychać. Dodatkowo użytkownicy zalecają układanie włókniny, nie przeszkadza on w przepływie wody, ale chroni piasek od spodu przed owadami czy kretami.
Rada. W przypadku stosowania polietylenu należy wywiercić w nim otwory, aby zrobić odpływ wody.
Wielu użytkowników narzeka, że po deszczu wokół piaskownicy pojawiają się kałuże. Eliminuje się to, układając warstwę tłucznia i poza obwodem piaskownicy – drenaż, układany o 400-500 mm. wokół piaskownicy pozwoli wodzie szybko spłynąć w dół.
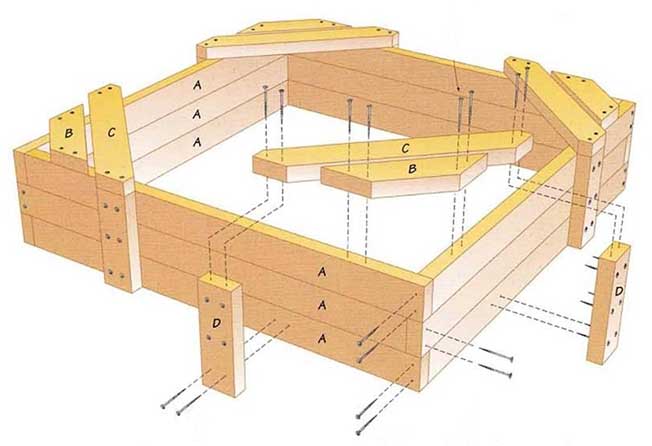
Etap 4 – Wykonanie piaskownicy dla dzieci własnymi rękami
Krótka technologia budowy:
1. w rogach zaznaczonych liną wbijane są kołki – podpora przyszłej piaskownicy;
2. z każdej strony zainstalowana jest jedna deska, pokryta środkiem antyseptycznym;
3. następnie przybity jest drugi rząd desek;
4. aby wyposażyć siedzenia, obrobione deski (2 po przeciwnych stronach, 4 po każdej stronie) lub narożniki ze sklejki są montowane poziomo na górze konstrukcji – najbardziej budżetowa opcja.
Rada. Ważne jest, aby śruby mocujące były dobrze osadzone w drewnie i nie powodowały obrażeń.
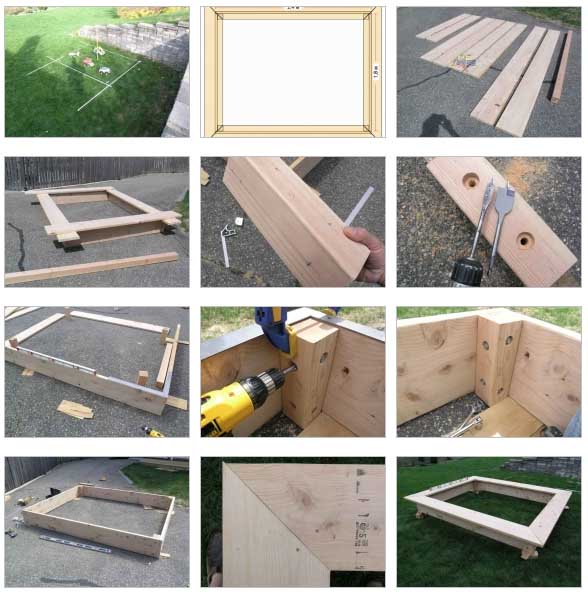
Druga opcja, jak zrobić piaskownicę z drewna
Metoda zakłada nieco inną kolejność prac, a mianowicie: najpierw wykonanie piaskownicy, następnie przygotowanie miejsca instalacji i dalszy montaż piaskownicy. Ta opcja jest wygodna, gdy praca jest wykonywana razem, ponieważ konstrukcja, choć lekka, jest dość nieporęczna i niewygodne jest instalowanie jej samodzielnie w tej kolejności.
Instrukcje krok po kroku dotyczące tworzenia piaskownicy własnymi rękami pokazano na zdjęciu.
Etap 5 – Wykonanie pokrywy na piaskownicę
Ponieważ piaskownica dla dzieci z pokrywą na letni domek jest bardziej atrakcyjną opcją – zastanów się, jak zrobić osłonę na piaskownicę.
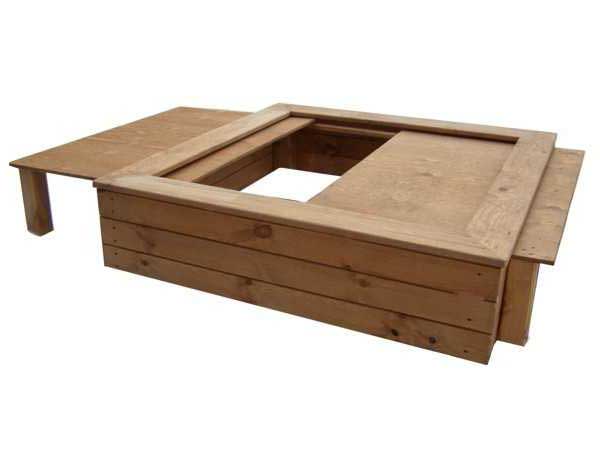
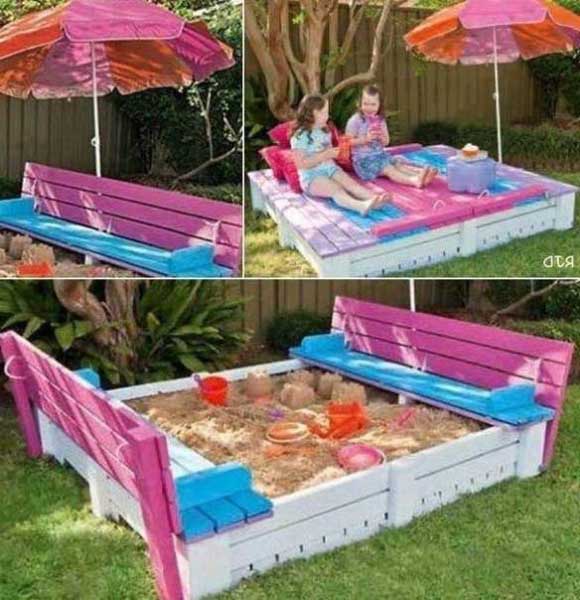
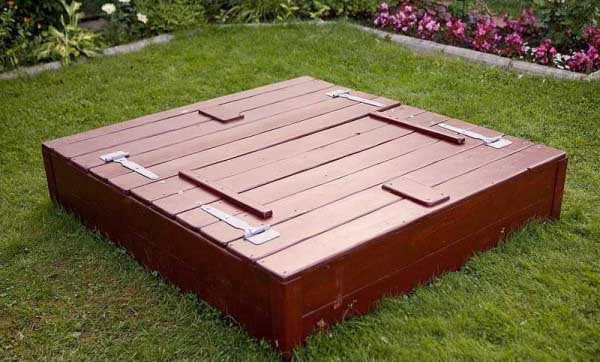
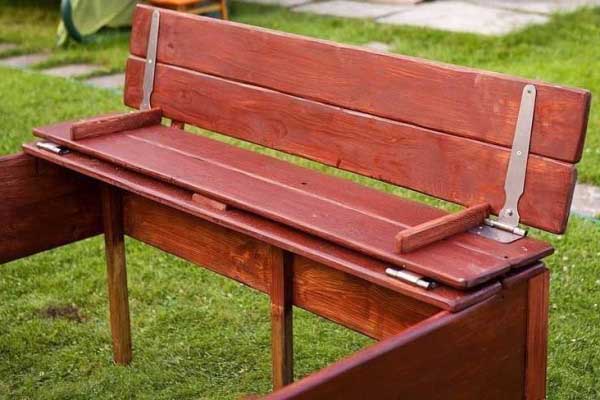
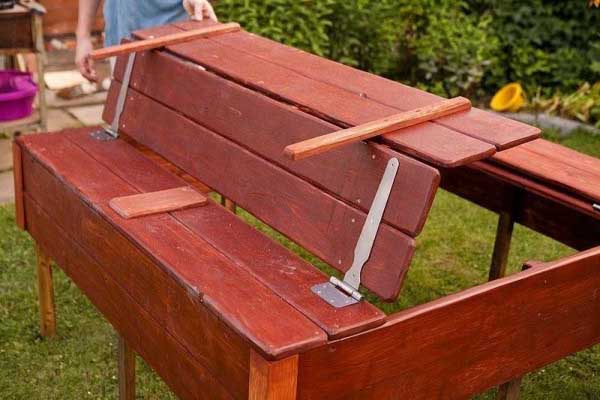
Najprostszą opcją byłaby zdejmowana osłona, czyli pokrywa zrzucona z desek, ale jej istotną wadą jest konieczność zdjęcia osłony przed rozpoczęciem zabawy.
Dlatego bardziej wskazane jest wykonanie konstrukcji z dwojgiem części, które przekształcają się (otwierają i składają) w siedzenia. Poniższe zdjęcie przedstawia dwie opcje osłony piaskownicy – składanie i przekształcanie w siedzisko. Należy pamiętać, że dwie zewnętrzne deski po obu stronach są nieruchome. Są solidnie zamocowane, dzięki czemu dziecko, a nawet osoba dorosła usiądzie na wieczku bez obawy, że go złamie.

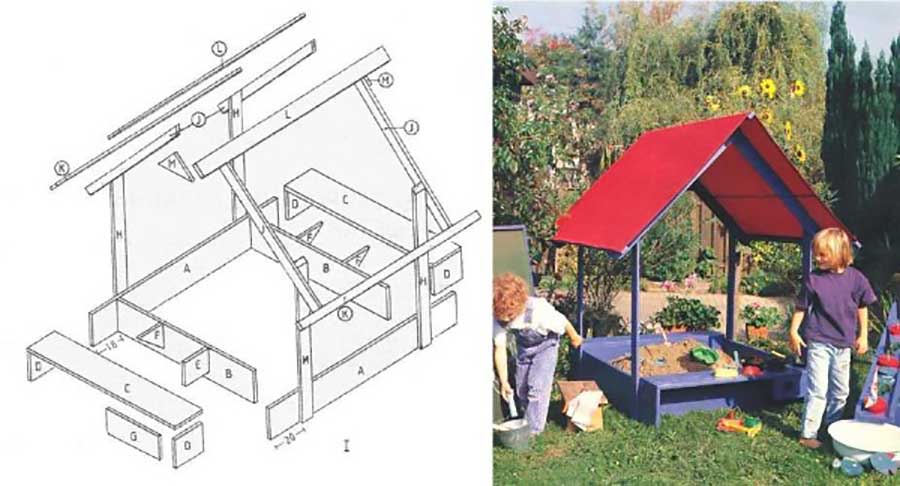
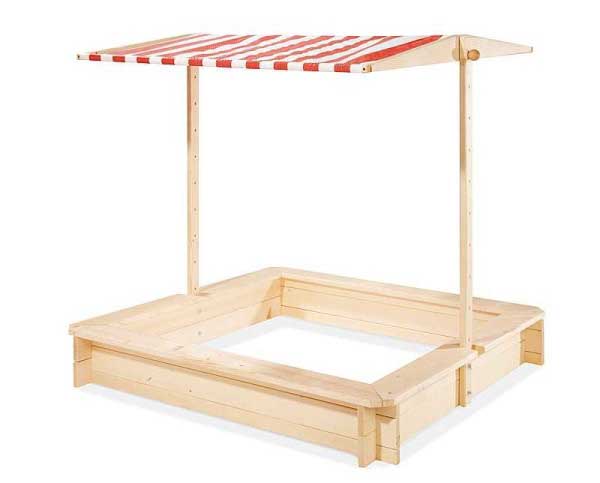
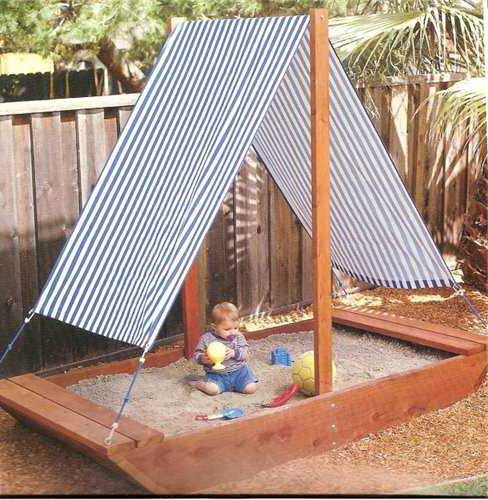
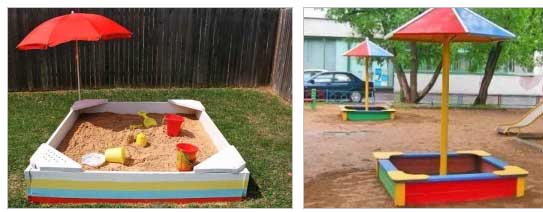
Etap 6 – Budowa zadaszenia dla piaskownicy
Ponieważ dzieci chcą bawić się w piasku o każdej porze dnia, należy chronić je przed bezpośrednim działaniem promieni słonecznych. Aby to zrobić, musisz zainstalować daszek nad piaskownicą. Może to być parasol lub stały dach wykonany w kształcie grzyba lub baldachimu.
Etap 7 – Piasek do piaskownicy dla dzieci
Jak wybrać piasek do swojej piaskownicy?
Należy zauważyć, że normy regulują wymagania dotyczące konserwacji wyposażenia placów zabaw, ale nie zawierają zaleceń dotyczących piasku, z wyjątkiem tego, że przy sprzedaży piasku jest to niezbędne do dostarczenia certyfikatów.
Jednak użytkownicy określili, jaki rodzaj piasku jest potrzebny do piaskownicy i mają następujące wymagania:
– brak zanieczyszczeń / przedmiotów;
– dobra sypkość;
– bezpyłowość. Małe cząsteczki piasku (frakcje mniejsze niż 0,1 mm) mogą dostać się do płuc dziecka. Aby je usunąć, piasek jest zwykle myty i suszony lub przesiewany przez bardzo drobne sito;
– formowalność;
– wilgotność. Piasek musi być suchy;
– higiena. Piasek nie powinien zawierać zwierząt (robaków, pająków, robaków itp.).
Jaki piasek jest najlepszy do piaskownicy
Wybierając piasek, lepiej jest preferować:
– piasek rzeczny, a nie piasek z kamieniołomów. Sam w sobie jest czystszy;
– przesiany, nie zawierająca ciał obcych;
– Idealny jest piasek kwarcowy. Jest czysty i dobrze się formuje.
Gotowy piasek do piaskownicy dla dzieci można kupić w sklepie. Obecność certyfikatu jakości zapewnia jego czystość i brak zanieczyszczeń.
Ile piasku potrzebuję do piaskownicy?
Aby wypełnić piaskownicę o wymiarach 1500×1500 mm należy przygotować około 0,5 metra sześciennego piasku.
Średnia cena 1 tony piasku do piaskownicy kosztuje 30 zł.
Jak i gdzie prawidłowo zainstalować piaskownicę dla dzieci.
Aby piaskownica służyła przez długi czas i nie stanowiła zagrożenia dla dzieci, podczas jej tworzenia i instalowania należy przestrzegać kilku zaleceń:
– nie używaj metalowych elementów;
– nie zostawiaj desek nieoszlifowanych;
– zapewnić obecność cienia;
– miejsce w dobrze widocznym miejscu;
– zapewnić brak kolczastych krzewów, roślin miododajnych i alergenów;
– używaj wysokiej jakości drewna i innych elementów budowlanych;
– zapewnij niezawodne mocowanie;
– brak instalacji elektrycznej, węży, rur itp.
Wniosek
Drewniana piaskownica z pokrywką lub otwierana to okazja nie tylko do zadowolenia dziecka, ale także wykazania się kreatywnością. Piaskownica w formie stolika, autka, sześciokątna lub okrągła – nie tylko zachwyci dziecko, ale także pozwoli ozdobić domek letniskowy niebanalnym, kreatywnym designem.
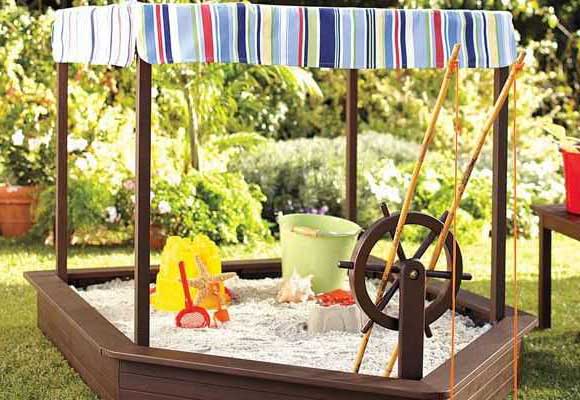
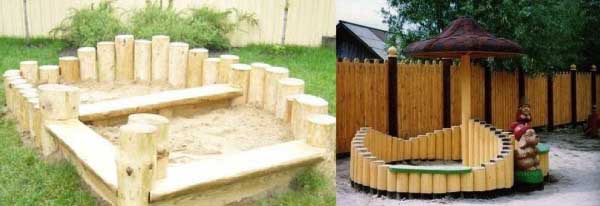
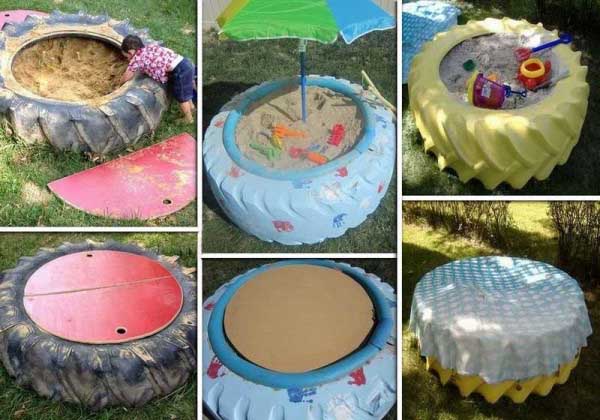
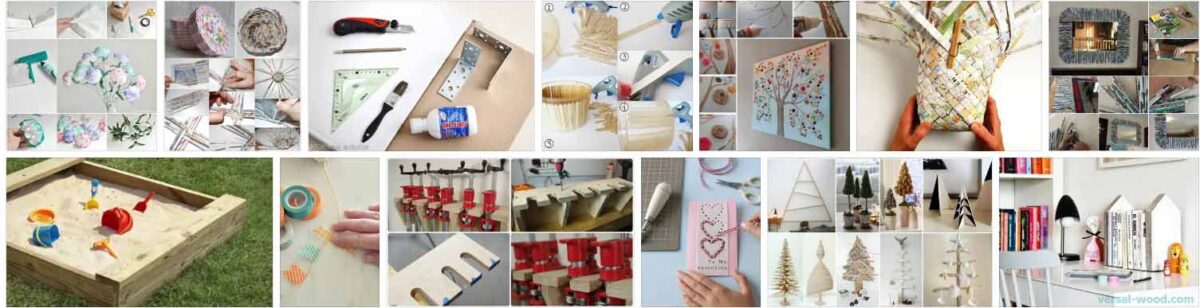
Poniżej galeria innych rodzajów piaskownicy.