 Jeśli kupimy gotowe, już przycięte na odpowiedni wymiar elementy – nie tylko szkło, ale również płyty MDF (płyta tylna, po dwie płyty dolne i górne o różnych wielkościach) – można przystąpić od razu do frezowania. Do grubości materiału szkła najlepiej pasuje frez do wpustów 6 mm. W przypadku mniejszych płyt być może okaże się, że trzeba będzie dno i płytę górną frezować powtórnie, jeśli szkło nie pasuje do wpustu przy pierwszej próbie.
Po wyfrezowaniu długich wpustów przy krawędziach tylnej ściany skręcamy ją na próbę z dnem. Ostatecznie montujemy elementy dopiero wtedy, gdy gotowe są także otwory w płycie górnej pod lampy, zamocowane podpory półek, a wszystkie elementy drewniane pomalowane bezbarwnym lakierem. Szkło wklejamy silikonem.
Precyzyjnie wyfrezowane wpusty w tylnej ścianie. Płyta górna i dolna chwytają profil szkła. Dzięki temu dwa skręcone ze sobą elementy z płyt MDF działają niczym jedna wielka, trzymająca wszystko klamra. Szkło mocujemy dodatkowo klejem.
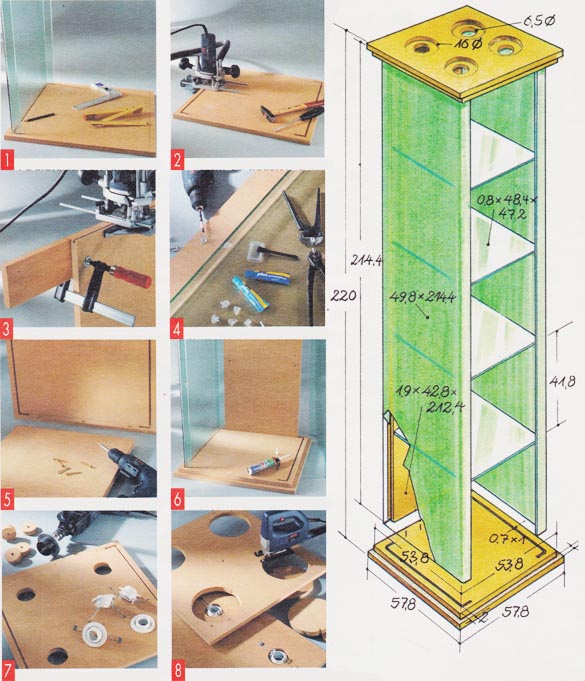
1. Po przycięciu płyt dna i płyt górnych odrysowujemy profil elementów szklanych na mniejszej płycie dna i płycie górnej.
2. Frezem do wpustów 6 mm wykonujemy wpust w dnie i w płycie górnej. Wewnętrzne krawędzie wpustu zaokrąglamy dłutem.
3. Krawędzie boczne tylnej ściany otrzymują wpust o głębokości 6 mm, umożliwiający mocowanie szkła.
4. W tylnej ścianie nawiercamy otwory pod podpory szklanych półek. Do szkła przyklejamy je klejem dwukomponentowym.
5. Płyty dna skręcamy od spodu z tylną ścianą. Wcześniej szlifujemy i załamujemy wszystkie krawędzie płyt.
6. Wszystkie elementy montujemy w stanie surowym, na próbę. Później, po lakierowaniu, wkleimy szklane ściany boczne silikonem.
7. Odpowiednio duże otwory na cztery lampki sufitowe wiercimy w mniejszej (dolnej) płycie piłą otwornicą.
8. W górnej części górnej płyty wykonujemy wycięcia tak duże, aby zmieściły się w nich klamry mocujące lampy sufitowe.


